Project configuration
This page contains:
Description
After installation of the TestFLO app, the Test Management configuration option becomes available in every project.
In Test Management it is possible to enable and manage TestFLO in four modules:
In General tab it is possible to configure Steps field (statuses and columns) and Preconditions.
Before enabling the TestFLO app, please read the information about the modules.
Warning
Configuration in Test Management is available to users with permissions:
- Jira System Administrators
- Jira Administrators
- Project Administrator
Steps
To get to the Test Management
- Click on Projects in main bar in Jira and select project from project list.
- Go to Project Setings by click on gear icon.
- Click on Test Management
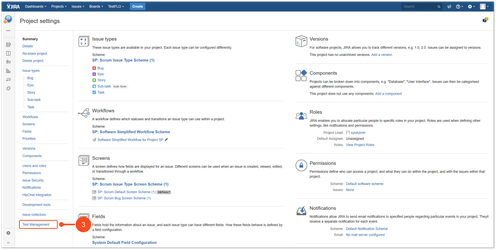
Result
View of Test Management introduction page
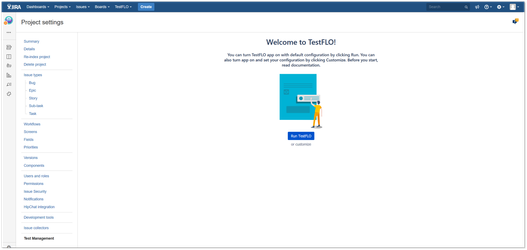
Info
The Test Management introduction page appears only if TestFLO hasn't been turned on in the project.
If TestFLO has already been turn on, after clicking on Test Management, the view shows tabs with names of modules that you can configure. To read more see Configuration.
Configuration
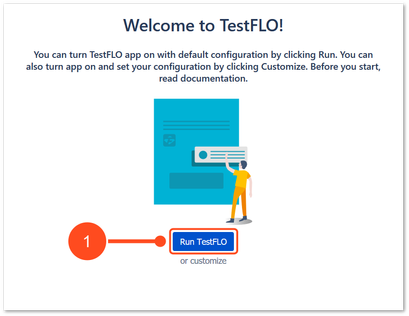
The Test Management introduction page provides two ways to turn app on.
- Run TestFLO which creates automatically default configuration in current project
- Customize which will guide you through the configuration wizard and allow to set your own configuration
Run TestFLO
Steps
To turn app on by Run TestFLO option
- Click on Run TestFLO
Results
The default configuration is created in project. The Test Repository tab, Test Execution tab and Preconditions have been turn on. From now on you are also able to configure the Requirements tab, Defects tab modules and General tab.
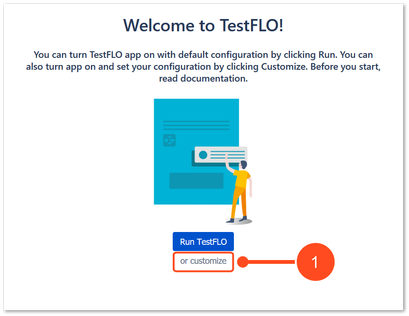
Customize
Steps
To turn app on by customize
- Click customize
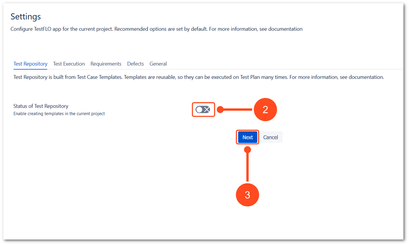
- Click the slider to enable Test Repository
- Click Next
- Click the slider to enable Test Execution
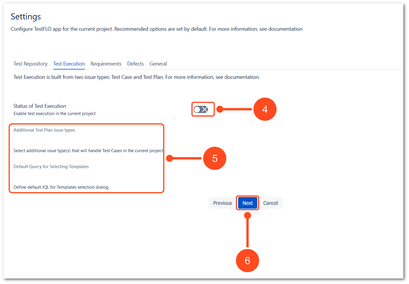
After enabling the Test Execution, the additional options become available.
Info
It is possible to set an additional issue type as Test Plan and set default query for searching templates. To learn more, go to Test Execution tab.
- Click Next
Click Add project to set project and issue type/s which will be treated as requirements
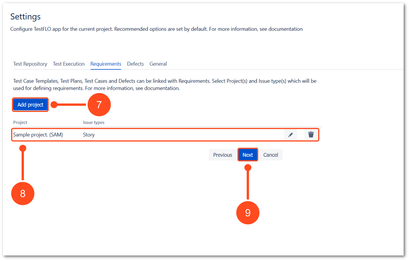
Selected project and issue type/s is displayed in the list
Info
To learn more, go to Requirements tab.
- Click Next
Click Add project to set project and issue type/s which will be treated as defects
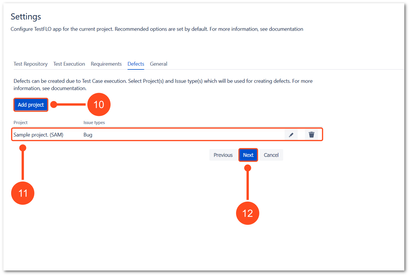
Selected project and issue type/s is displayed in the list
Info
To learn more, go to Defects tab.
- Click Next
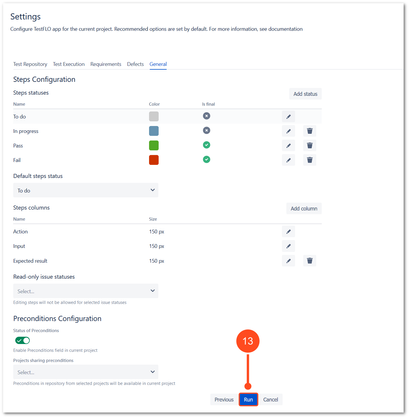
(Optional) Set configuration of Steps and Preconditions and click Run
Info
To get more information see General tab.
Results
The configuration is complete. From now on you can use the TestFLO app.