Configuration v1.2+
Workflow Mapping

v1.2 - v1.3.2

v1.3.3+

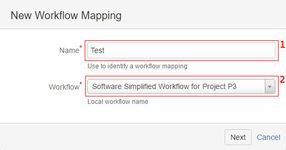
1. Workflow mapping name
2. Workflow
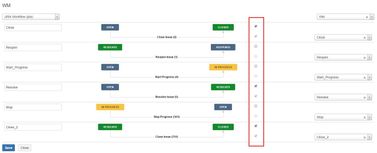
3. Outgoing transition code
4. Remote workflow mapping
5. Incoming transition code - remote outgoing transition code
6. Resolution (since v1.3.1)
How to create workflow mapping
1. In JIRA1 create new worklow mapping:
a) click Add in Workflow Mapping Scheme
b) enter Name (1) and select Workflow (2)
c) enter Outgoing transition code (3) ![]() It requires at least one value to make this workflow mapping visible to the remote.
It requires at least one value to make this workflow mapping visible to the remote.
d) click Save
2. In JIRA2 create new worklow mapping:
a) click Add in Workflow Mapping Scheme
b) enter Name (1) and select Workflow (2)
c) enter Outgoing transition code (3) ![]() It requires at least one value to make this workflow mapping visible to the remote.
It requires at least one value to make this workflow mapping visible to the remote.
d) select Remote workflow mapping (4) (from step 1) ![]() If you don't see expected value, wait for synchronization or click Synchronize configuration in Connection configuration.
If you don't see expected value, wait for synchronization or click Synchronize configuration in Connection configuration.
e) select Incoming transition code (5)
f) click Save
3. In JIRA1 edit worklow mapping (from step 1):
a) select Remote workflow mapping (4) (from step 2) ![]() If you don't see expected value, wait for synchronization or click Synchronize configuration in Connection configuration.
If you don't see expected value, wait for synchronization or click Synchronize configuration in Connection configuration.
b) select Incoming transition code (5)
c) click Save
Please, keep in mind to enter some incoming transition code, if you want given status to be synchronized.
Resolution
Since v1.3.1. Comparing to previous version it:
![]() Resolution support
Resolution support
Resolution is sent when the flag is enable.
You are required to have the same resolutions list in both jiras.Different workflows
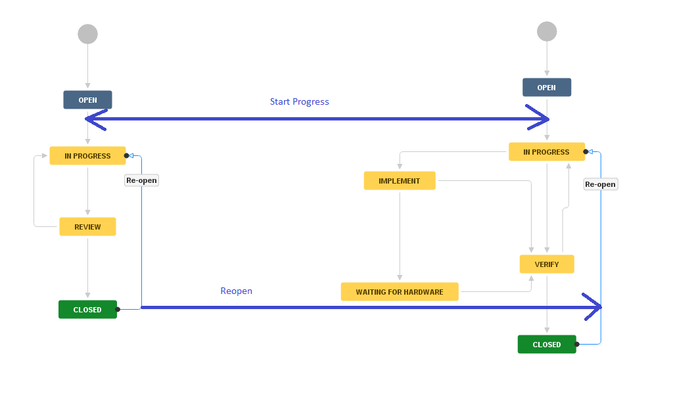
In case you have different workflows, it is good to start with drawing these workflows. Then create a line between transitions you want to synchronize. Type a text on top of the line (it can be used later in workflow synchronization configuration). Transitions can be bidirectional but it is better to think about it as two separate transitions (one in, one out).
Contract configuration
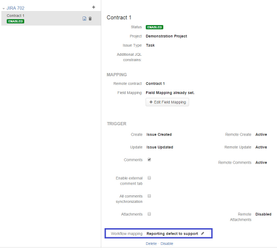
On contract configuration page you select proper mapping.
- Single mapping can be shared with several Contracts.
 Change in given Workflow Mapping configuration will affect all linked Contracts.
Configuration v0.8 - v1.1
Video for Example configuration
Access
Workflow synchronization mapping is accessible through Administration -> Add-ons -> IssueSYNC -> Workflow Mapping
Currently there is single configuration file. It uses JSON format to save data.

In future JSON editor will be covered by more user friendly UI. The configuration data will stay the same, so migration to new UI will be transparent.
More about JSON Format
Configuration format
 {
  "configuration" : [
    {
      "workflowMappingId" : 1,
	  "workflowMappingDisplayName" : "Reporting defect to support",
      "workflowId" : 10001,
      "outgoingTransitions": [
        {
          "prevStatusId" : 2,
          "currStatusId" : 5,
          "outTransitionText" : "Start progress"
        }
        ],
      "incomingTransitions": [
        {
          "inTransitionText" : "Resolved",
          "workflowTransitionId" : 41
        }
        ]
    }
  ]
}
- configuration - There is a single configuration element.
- Next level is a mapping set. It will show up on (2) Contract (Trigger section)
- workflowMappingId - Enter any unique number that will identify this configuration set.
- workflowMappingDisplayName - Provide an understandable name for your mapping.
- workflowId - (Currently not used. For future purpose.) Enter workflowId of workflow that will be used in given configuration set.
- outgoingTransitions - Root element for outgoing transitions configuration. It can have many children.
- Next level describes single transition trigger. You issue's status change (from-status and to-status) in order to execute remote transition.
- prevStatusId - Status that issue was before transition.
- currStatusId - Status that issue was transitioned to.
- outTransitionText - Control text that will be sent to remote JIRA. Based on that remote-JIRA admin can take a decision what to do (see below incomingTranistions).
- incomingTransitions - Root element for incoming transitions configuration. It can have many children.
- Next level describes single transition decision point.
- inTransitionText - If given text will be send from remote JIRA, then execute below transition.
- workflowTransitionId - Each workflow transition has its id. Enter the one you want to execute when given trigger text will be received from remote JIRA.
- useRestApi - (Optional) Set this flag to true if you want to call JIRA REST API instead incode transition (that skips workflow conditions).
Exchange configuration guide
To exchange workflow configuration with remote JIRA administrator it is enough to send him:
- outTranistionText - for outgoing tranistions
- inTransitionText - for incoming transitions
Example
Below screen shows configuration for two, cooperating JIRAs.
At top, first JIRA A creates a ticket that is sent to second JIRA B. Ticket waits in OPEN status. JIRA B makes transition from OPEN to ACTION NEEDED. That triggers JIRA A to IN PROGRESS. JIRA B can BLOCK or SCHEDULED ticket without coconsequences in JIRA A but if it goes to PENDING EXTERNAL status it triggers in JIRA A RESOLVED status. From now, JIRA A can accept or reject issue sending it to REOPENED or CLOSED status accordingly. That will trigger transitions in JIRA B.
Mind that statusID is not what you can see in Administration -> Workflow screen. Please use help box at the right for workflows provided.

Configuration editor
Configuration editor works in two modes:
- Code (default)
- Tree
Tree mode is very handy for fast multiplying some elements. In example below new mapping is added for outgoingTransitions by selecting 'Duplicate' action from node context menu:

You can still save file on your local hard drive and use your favorite JSON editor instead. When file is ready, simply paste its content in Code mode.