Configure IssueSYNC via REST API
IssueSYNC uses a REST API for communication with the configuration interface in the admin panel.
Because of this, it is possible to complete the configuration by sending requests to specific endpoints as opposed to configuring it manually via the configuration interface.
Headers
IssueSYNC requires Basic Jira Authentication. Every request needs to provide username and password as well as a Content-Type of application/json. Every request to configuration endpoints needs the following header:
X-JIRA-SYNC-CONFIG: true
Please keep in mind that sometimes because of multiple subsequent login attempts, CAPTCHA may turn on and deny all requests. You can turn off CAPTCHA login in user management.
An example request using cURL will look like this:
curl -u username:password -X GET -H "Content-Type: application/json" http://example.com/rest/synchronizer/1.0/sync-scheme
An example using Postman: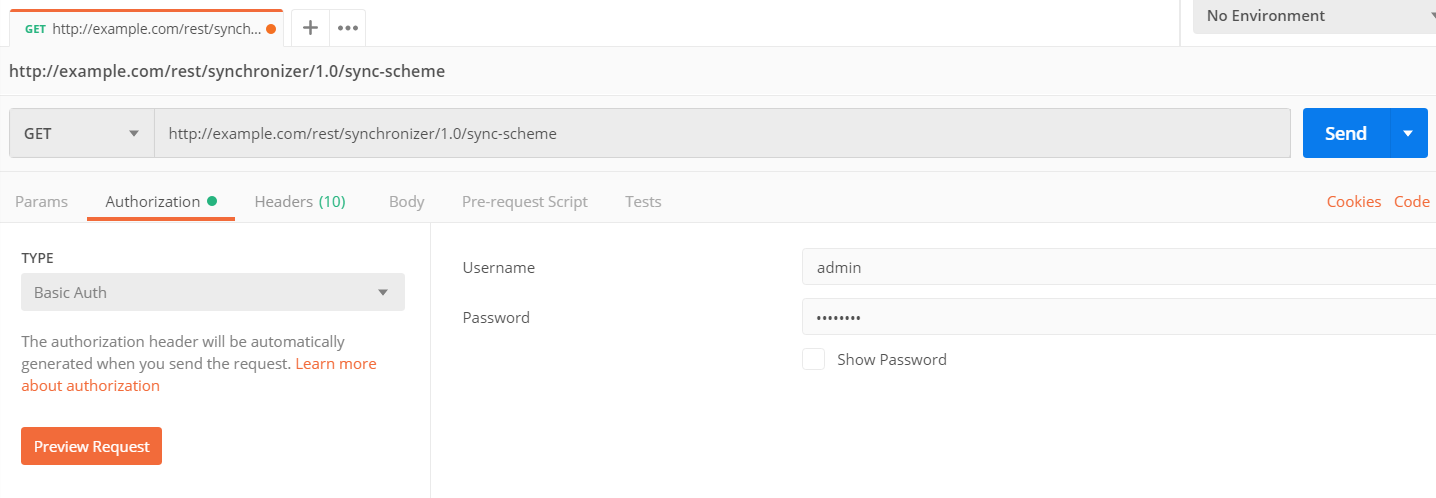
With the content type header:

For more information on Basic Authentication we recommend this resource.
The base API URL is: http://your-jira-baseurl.com/rest/synchronizer/1.0/
Step by step configuration
Creating and testing an IssueSYNC Technical User.
A Technical User is a Jira user that has been delegated towards synchronization. All changes and issues will be created by the technical user on IssueSYNCs behalf. Every connection requires a Technical User in order to make requests to the interlan Jira API and create issues, apply changes to issues and so on. It is desireable that such user will not be normally used (i.e. it should not be an actively used admin account). We recommend creating a separate Technical User to be used throughout IssueSYNC.
Please remember that Jira Users and Technical Users are separate entities. IssueSYNC uses existing Jira user's credentials in order to create a Technical User that will log in with those credentials.
Firstly, you may want to get all available Technical Users created by IssueSYNC.
[
  {
    "id": 0,
    "userCred": "encodedPassword" // base64 encoded,
    "userDisplayName": "Technical User",
    "userId": 0,
    "userMail": "mail@example.com",
    "username": "technicaluser"
  }
]
If no Technical Users are returned, we can create one from an existing user.
{
  "userCred": "encodedPassword" // has to be base64 encoded,
  "userId": jiraUserId,
  "userMail": "email@example.com",
  "username": "jiraUser"
}
When the response is successful, we can create the technical user.
{
	id: 25
	userCred: "encodedPassword" // has to be base64 encoded,
	userId: jiraUserId
	userMail: "email@example.com"
	username: "jiraUser"
}
Upon successful creation we can now use the technical user credentials (username and UNENCODED password in our request headers).
Creating connections
Local (within one Jira instance)
The request body consists of two connections. Functionally, a local connection is treated the same as a remote connection so it is necessary for two connections to be created. Remote and Local keys need to be manually generated and they must be unique in every connection. Technical User id is the id we get when making a GET request to /technicalUser.
[
   {
      "id":1,
      "localKey":"key1", // this is normally generated automatically, because configuration is done via API calls, we have to create keys manually
      "remoteKey":"key2", // Connection2's local key
      "remoteUrl":"http://localhost:8080/jira1",
      "remoteJiraType":"SERVER",
      "name":"Connection1",
      "technicalUserId":1 // this is NOT Jira User id
   },
   {
      "id":2,
      "localKey":"key2",
      "remoteKey":"key1", // Connection1's local key
      "remoteUrl":"http://localhost:8080/jira1",
      "remoteJiraType":"SERVER",
      "name":"Connection2",
      "technicalUserId":1 // this is NOT Jira User id
   }
]
Server and Passive Server (two Jira instances)
Both sides of the synchronization need to do this.
[
   {
      "localKey":"localKey",
      "remoteJiraType":"SERVER", // or PASSVIE_SERVER
      "passive":false,
      "name":"RemoteConnection",
      "remoteUrl":"remoteJiraUrl.com",
      "technicalUserId":1
   }
]
After creating both connections, two sides have to exchange keys. If both sides have their respective key pairs, we can test the connection.
{
   "id":82, // this id is returned in the response of the previous call - connection creation
   "name":"RemoteConnection",
   "technicalUserId":1,
   "remoteUrl":"remoteJiraUrl.com",
   "localKey":"localKey",
   "status":false,
   "passive":false,
   "remoteJiraType":"SERVER",
   "connectionType":"SERVER",
   "connectionTier":"FIELD_MAPPING",
   "remoteKey":"remoteKey"
}
When connections have been tested, we can now update them to contain both keys.
{
   "id":82,
   "name":"RemoteConnection",
   "technicalUserId":1,
   "remoteUrl":"remoteJiraUrl.com",
   "localKey":"localKey",
   "status":false,
   "passive":false,
   "remoteJiraType":"SERVER",
   "connectionType":"SERVER",
   "connectionTier":"FIELD_MAPPING",
   "remoteKey":"remoteKey"
}
After saving connections, we can now proceed to Synchronization Scheme creation.
Synchronization Schemes
In order to create a new Synchronization Scheme we need to have a working connection.
{
   "draft":true,
   "name":"SyncScheme",
   "connectionId":78,
   "projectId":null
}
The response we get can be saved for convenience when updating the Sync Scheme with new data.
{
   "id":152,
   "name":"SyncScheme",
   "draft":true,
   "contextIds":[

   ],
   "connectionId":78,
   "fieldMappings":[

   ],
   "comments":{
      "exposeComments":true,
      "commentType":"INTERNAL",
      "receiveComments":true,
      "receivedCommentType":"INTERNAL",
      "existingAndNewComments":true,
      "restrictedComments":false,
      "exposeCommentConfirmation":true,
      "receiveCommentsCustomEnabled":false,
      "commentContent":{
         "issueLink":true,
         "context":true,
         "author":true,
         "date":true
      }
   },
   "attachments":{
      "on":true,
      "receivedOn":true,
      "existingAndNewAttachments":true,
      "prefixAttachmentName":false
   },
   "triggers":[
      {
         "eventType":"UPDATE",
         "events":[
            {
               "id":391,
               "syncSchemeId":152,
               "eventId":2,
               "eventType":"update"
            },
            {
               "id":392,
               "syncSchemeId":152,
               "eventId":13,
               "eventType":"update"
            }
         ]
      },
      {
         "eventType":"CREATE",
         "events":[
            {
               "id":390,
               "syncSchemeId":152,
               "eventId":1,
               "eventType":"create"
            }
         ]
      }
   ],
   "worklog":{
      "on":false,
      "receive":false,
      "existing":false
   },
   "exposedFields":[

   ],
   "receivedFields":[

   ],
   "allTriggers":[
      {
         "id":391,
         "syncSchemeId":152,
         "eventId":2,
         "eventType":"update"
      },
      {
         "id":392,
         "syncSchemeId":152,
         "eventId":13,
         "eventType":"update"
      },
      {
         "id":390,
         "syncSchemeId":152,
         "eventId":1,
         "eventType":"create"
      }
   ]
}
This leaves us with a default empty Sync Scheme. Now we can create Contexts;
Contexts
Firstly, we need to create a Context draft by specifying a name and the id of the Sync Scheme the Context will belong to.
{
   "name":"Context"
}
The response we get is as follows:
{
   "id":80, // our newly created Context Id
   "name":"Context",
   "status":false,
   "isError":false,
   "error":false
}
Now, we need to fill our Context data and save it.
Context needs to have a Project, Issue Type and a Remote Context specified to be complete.
First, we will get Projects:
[
   {
      "expand":"description,lead,url,projectKeys",
      "self":"http://localhost:8080/jira1/rest/api/2/project/10001",
      "id":"10001",
      "key":"DEMO",
      "name":"DEMO Project",
      "avatarUrls":{
         "48x48":"http://localhost:8080/jira1/secure/projectavatar?avatarId=10324",
         "24x24":"http://localhost:8080/jira1/secure/projectavatar?size=small&avatarId=10324",
         "16x16":"http://localhost:8080/jira1/secure/projectavatar?size=xsmall&avatarId=10324",
         "32x32":"http://localhost:8080/jira1/secure/projectavatar?size=medium&avatarId=10324"
      },
      "projectTypeKey":"business"
   },
	{
		///...
	}
]
Then, we will get Issue Types for selected project:
[
   {
      "id":"10005",
      "name":"Task",
      "isSubTask":false,
      "iconUrl":"/images/icons/issuetypes/genericissue.png"
   },
   {
      "id":"10007",
      "name":"Demo Issue Type",
      "isSubTask":false
   }
]
And finally, Remote Contexts:
[
   {
      "id":433,
      "connectionId":3,
      "name":"ServiceDesk",
      "remoteContextId":3
   },
	{
		/// ...
	}
]
After collecting all required information for a new Context, we can save it by:
{
   "id":82, // id returned when we created the Context draft
   "name":"Context",
   "status":false,
   "isError":false,
   "error":false,
   "project":{
      "id":"10001",
      "key":"DEMO",
   },
   "issueType":{
      "id":"10005",
   },
   "remoteContext":{
      "id":454,
      "connectionId":76,
      "remoteContextId":79
   },
   "jqlFilter":"1 = 1" // optional
}
Afterwards, we need to activate the context. This is done by executing a PUT request to /context/activate with the payload we received as a response to the above PUT to /context
Field Mapping
Field mapping is divided into two sections. First, we will configure Exposed fields. To do this, we need to fetch all exposable Jira fields (meaning fields from Issue Types specified in Contexts). We can do this by executing the request below:
[
	{
      "id":"description",
      "name":"Description",
      "viewName":"issue.field.description",
      "fieldAlias":"issue.field.description",
      "type":"TYPE_NATIVE",
      "required":false,
      "orderable":true
   },
   {
      "id":"customfield_11005",
      "name":"TP Status",
      "viewName":"TP Status",
      "fieldAlias":"TP Status",
      "type":"TYPE_NATIVE",
      "required":false,
      "orderable":true
   },
	// ...
]
We then save exposed fields like so:
{
   "id":150, // Sync Scheme Id
   "connectionId":76,
   "exposedFields":[
      {
         "syncSchemeId":150,
         "localFieldId":"customfield_10501",
         "localFieldName":"test2",
         "exposed":true
      }
		// ...
   ],
}
In order to add more exposed fields later on, we need to send the entire list exposed fields list (available under GET /field/exposedFields/[syncSchemeId])
For received fields, we can use the local exposable fields that we received earlier and map them to remote fields that we will get by the call below:
[
   {
      "contractName":"DEMO contract two",
      "fieldId":"labels",
      "fieldName":"labels",
      "fieldType":4
   },
   {
      "contractName":"DEMO contract two",
      "fieldId":"security",
      "fieldName":"Security Level",
      "fieldType":4
   },
	// ...
]
Those are fields that the other side has exposed. We can now save them by sending a similar request. We need to include the entire Sync Scheme object for this request.
{
   "id":150, // Sync Scheme Id
   "connectionId":76,
   "exposedFields":[  // list of all exposed
      {
         "syncSchemeId":150,
         "localFieldId":"customfield_10501",
         "localFieldName":"test2",
         "exposed":true
      }
		// ...
   ],
	"receivedFields": [
		"exposed": false,
		"id": 413518,
		"legacy": false,
		"localFieldId: "customfield_1234",
		"localFieldName: "demo custom field",
		"received": true,
		"remoteFieldId": "labels",
		"remoteFieldName": "Labels",
		"syncSchemeId": 150
		/// ...
	],
}
In depth API documentation
We provide an API description json file that can be pased into Swagger editor. On the right side of the editor all configuration endpoints, their requests and responses as well as data models will be shown.
The above documentation provides merely the order of steps for configuration. After that flow is achieved, it can be automated with scripts that will use models described in the json file.