IssueSYNC
 Installation
Do
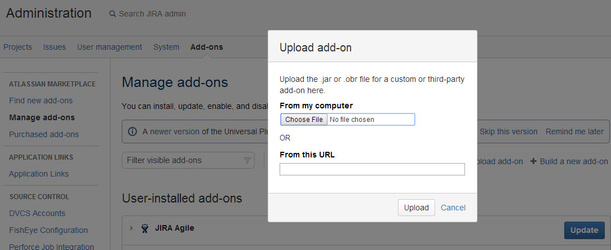
- Download the plugin OBR file from Atlassian Marketplace.
- Go to Administration -> Add-ons -> Manage add-ons and press Upload add-on link.
- Select the plugin OBR file and press Upload.
- For more, follow plugin installation Instruction Atlassian's Documentation / UPM
Result
- The Synchronizer plugin should be installed in your JIRA..
 Basic Setup
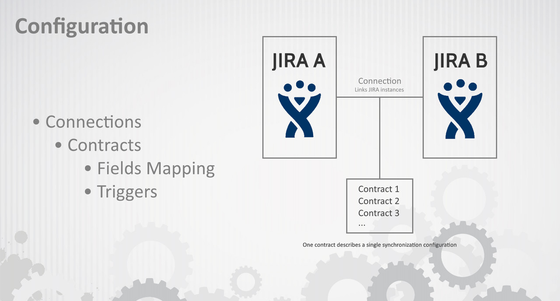
- You have to start with Connections setup where you define all remote JIRAs you want to synchronize with.
- You will have to create a corresponding connection on the remote JIRA (ask the Remote JIRA Administrator for details such as URL, API_KEY).
- When connections are defined on both sides and the connection tests pass, you can start to set up Fields Mapping. Fields Mapping is a set of JIRA fields and custom fields that you want to synchronize with the given remote JIRA (connection). You can reuse a given set of fields when defining Contracts.
- A Contract is a single synchronization point. It always matches to a single Issue Type in a given Project. For more details about setup, please visit the Administrator's Guide chapter.
At least one JIRA has to be able to perform requests to another JIRA instance, for the sake of simplicity in this tutorial we assume that there are no firewalls between JIRA instances. If there is in fact a firewall, you can mark a passive instance flag on the connection, but it's out of the scope of this introduction, so please refer to connection administration for more information.
 Detailed Setup
There are two JIRAs in this scenario: JIRA A (left in table), JIRA B (right in table).
JIRA A | JIRA B | ||
| PrepareIn order to start working with IssueSYNC - JIRA to JIRA Integration you need to prepare some information:
When you collect all this information, then you can start working on the plugin configuration. | ||
| Keys Exchange | ||
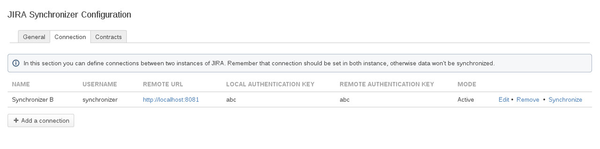
| Connection A SetupAdd a connection to link JIRA instances. You can do this by clicking in Add-ons -> IssueSYNC -> Configuration.
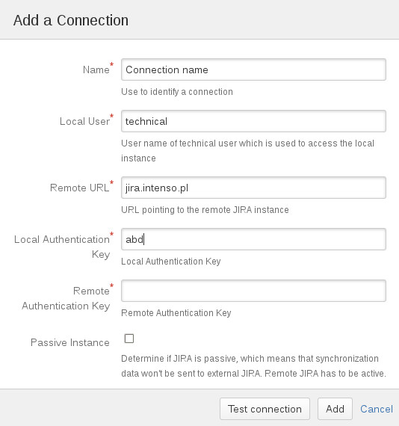
In order to add a connection click the Add a connection button. You will see a dialog, where you can put most of the information gathered in the first step.
If you click on Test connection and there is no validation error, then you will see a message ,,Local connection success. Remote connection error. Please check your settings. '' which is OK because the remote connection was not yet created. If you get an error concerning the local connection, then you have probably set a user that doesn't exist. At this point you have to add a connection without testing if it is correct. You will come back and check it later (when the remote JIRA administrator will add a connection in the remote instance) and ensure that is correct.
| ||
| Connection B Setup | ||
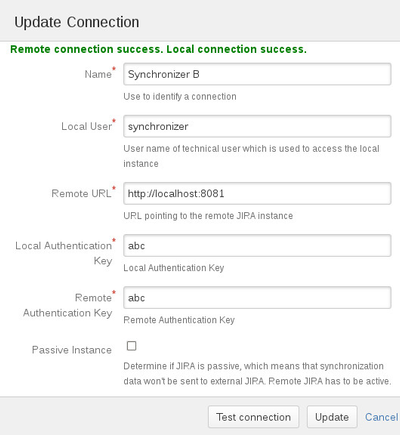
| Connection TestYou can test your connection now. Both messages should be green (success).
| ||
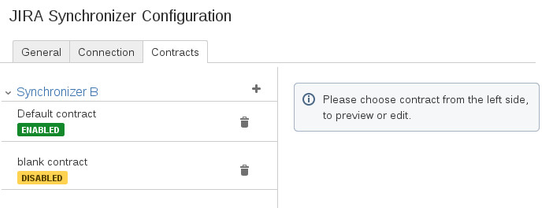
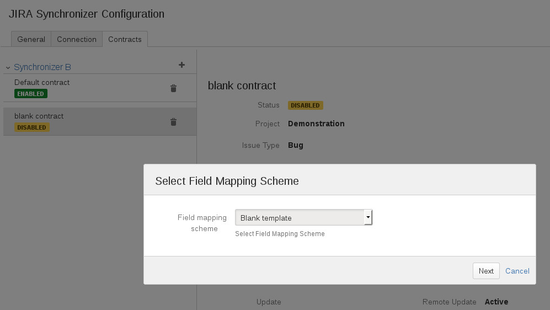
| Contract A SetupGo to the Contract configuration page (click the contract tab) in order to decide what should be synchronized.
The next step is to: 1) Set Project in which issues will be synchronized. 2) Set Issue Type to specify what type of issue will be synchronized. 3) Select Remote Contract - if the list is empty you have to wait for the remote JIRA Administrator to add a contract to his JIRA instance.
| ||
| Contract B SetupGo to the Contract configuration page and follow the same steps as JIRA Administrator A did. | ||
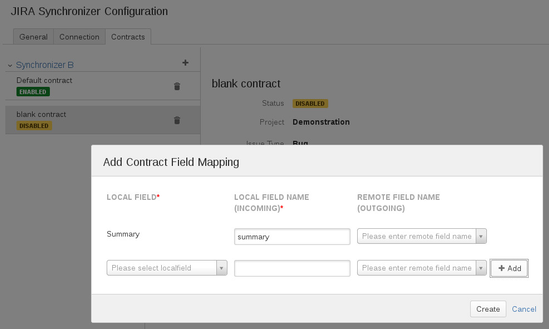
| Field Mapping A4) When the JIRA B Administrator has created a contract, you can choose Remote Contract from the list. 5) While the contract states which issue type in which project should be synchronized, you still have to define which fields will be synchronized.
One field mapping entry consists of three values:
There is no explicit convention for what will happen if you don't set the remote field name, or don't add a field, but that is out of the scope of this introduction, please refer to the Diagnostic page for more details. | ||
| Field Mapping BCreate a Field Mapping by following the same steps as JIRA Administrator A did.
| ||
| Contract A Tuning | ||
| Contract B TuningSet trigger events the same way as the JIRA A Administrator did and activate your contract. | ||
| Test | ||